adobe photoshop 7.0
What is Adobe Photoshop?
Adobe Photoshop is a popular and widely-used graphics editing software developed by Adobe Inc. It is primarily used for editing and manipulating digital images and photographs. Photoshop offers a wide range of features and tools for tasks such as image retouching, color correction, photo enhancement, graphic design, digital painting, and more. Some of the key features and functions of Adobe Photoshop include:
1. Image Editing: You can use Photoshop to adjust brightness, contrast, and color balance in photos. It also provides tools for cropping, resizing, and rotating images.
2. Layers: Photoshop allows you to work with layers, which are like transparent sheets that you can stack on top of each other. This makes it easy to edit specific parts of an image without affecting the rest.
3. Selection Tools: Photoshop offers a variety of selection tools, such as the marquee, lasso, and magic wand, to select and isolate specific areas of an image.
4. Retouching and Healing: The software provides tools for retouching and repairing photos, including the Clone Stamp tool, Healing Brush, and Content-Aware Fill, which can remove blemishes or unwanted objects from images.
5. Filters and Effects: Photoshop includes a wide range of filters and special effects that can be applied to images, allowing you to create artistic or stylistic modifications.
6. Text and Typography: You can add and manipulate text in your images, making Photoshop a valuable tool for graphic design and creating text-based artwork.
7. Drawing and Painting: Adobe Photoshop offers a set of brushes and drawing tools that enable digital artists to create illustrations, paintings, and other artwork.
8. 3D Modeling and Texturing: The software has 3D capabilities, allowing users to work with 3D models and apply textures, lighting, and rendering effects.
9. Photo Manipulation: Photoshop is often used to create photomontages, where multiple images are combined to create a composite image.
10. Image Export and Optimization: You can save images in various file formats, and Photoshop offers options for optimizing images for web use, printing, or other purposes.
How to import a file in photoshop?
How to resize a picture?
How to adjust pixels in photoshop?
How to remove background color in photoshop?
How to change background color of a image in Photoshop
How to crop a image in Photoshop?
power point 6
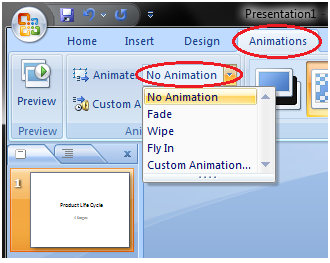
How to Apply Animation Effect
- Select the text or object you want to animate
- Select the Animations tab
- In Animations group click the drop-down arrow next to Animate option
- Animation options will appear
- Move the cursor over different options to see live preview on the slide
- Select the desired animation
See the image:

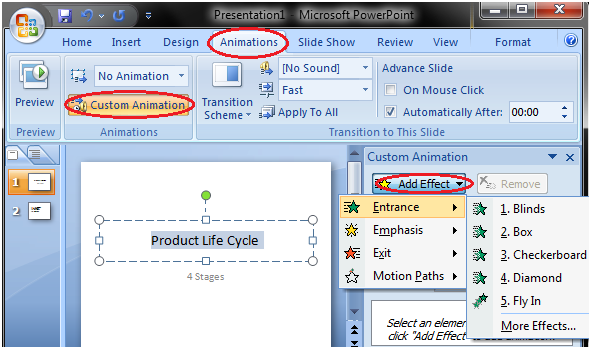
How to Apply a Custom Animation Effect
- Select the text or object
- Select the Animation tab
- In Animation group click the Custom Animation
- Custom Animation task pane appears on the right
- Click the Add Effect, it will display four options that are further divided into different options
- Select the desired effect
See the image:

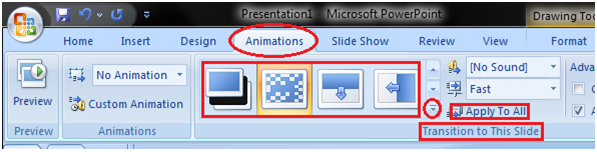
How to Apply Slide Transition Effects
Transition effects appear when one slide changes into next slide in a Slide Show.
- Select the slide to which you want to apply the effect
- Select the Animation tab
- In Transition to This Slide group you will see the transition effects
- Click the drop-down arrow to see menu of transition effects
- Select the desired transition effect
- Click Apply To All to apply the effect to all slides
See the image:

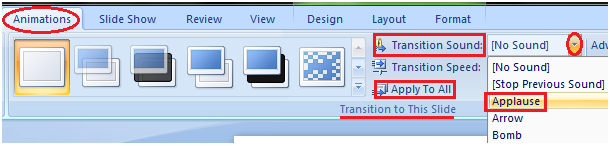
How to Set Slide Transition Sound
- Select the slide to which you want to add the transition sound
- Select the Animation tab
- In Transition to This Slide group click the drop-down arrow next to Transition Sound option
- A list of different transition sounds appears
- Select the desired transition sound
- Click Apply To All to apply the effect to all slides
See the image:

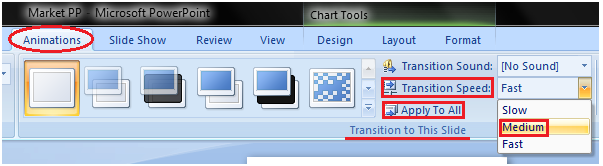
How to Set Slide Transition Speed
- Select the slide
- Select the Animation tab
- In Transition to This Slide group click the drop-down arrow next to Transition Speed option
- It will display three options for transition speed
- Select the desired transition speed
- Click Apply To All to apply the same transition speed to all slides
See the image:

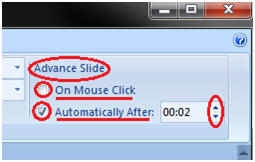
How to Advance Slides
- Select the slide
- Select the Animations tab
- In Transition to This Slide group locate the Advance Slide section
- It shows two options; On Mouse Click and Automatically After
- Enter the desired time for the selected slide in Automatically After option
- Select the next slide and choose the desired time
- Click Apply To All If you want to apply the same timing to all slides
See the image:

Viewing Slides
Once you create the presentation you can view it in different ways.
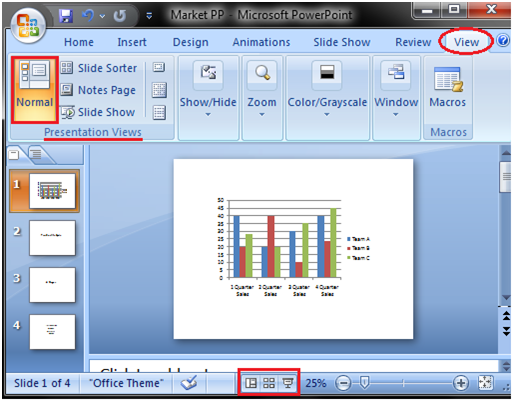
Select the View tab. Locate the Presentation Views group. It displays four options to view presentations; Normal View, Slide Sorter View, Slide Show View and Notes Page View.
Normal View: The normal view appears by default when we open the PowerPoint window. We create and edit slides in Normal View. This view also offers three view options out of four options in the form of buttons on the status bar.
See the image:

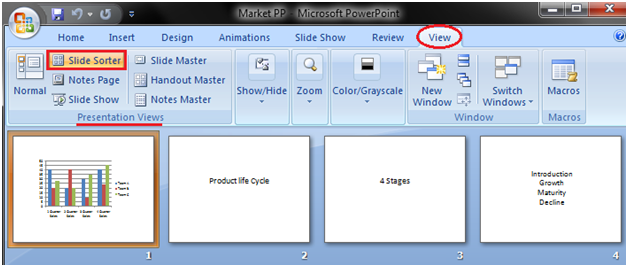
Slide Sorter View: It offers miniature or thumbnail version of all slides. You can see all your slides at one time in the screen. You can also drag or delete the slides to rearrange them.
See the image:

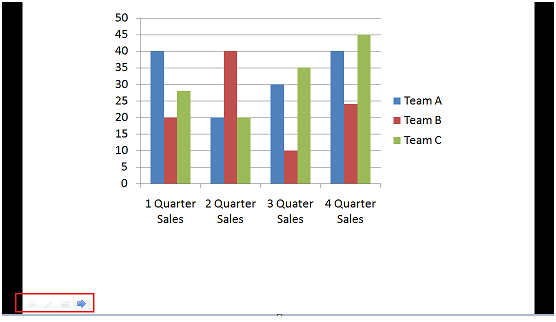
Slide Show View: It displays your presentation in full screen mode. It also offers an additional menu at the left bottom corner of the slide.
See the image:

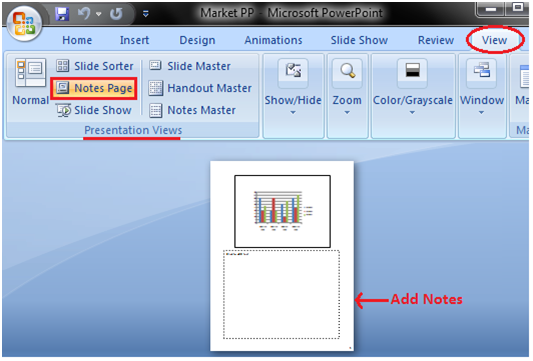
Notes Page View
This view provides space below the slide to add notes.
See the image:
power point: 5
How to Insert Table
- Place the cursor on the slide where you want to insert the table
- Click the Insert tab, it will display Tables group on the left
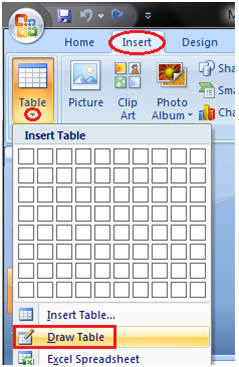
- Click the Table button, it will display four options to insert the table:
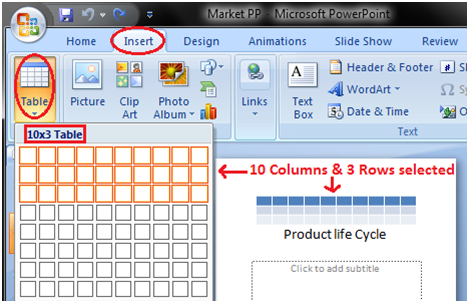
1) Highlight the Number of Rows and Columns
You will see small boxes on top, select the boxes corresponding to number of rows and column that you want in your table.
See the image:

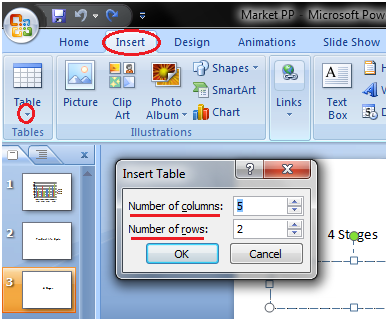
2) Insert Table
Click the Insert Table option and enter the number of rows and columns then click ok.
See the image:

3) Draw Table:
Click the Draw Table option and place the cursor on slide. Cursor changes into a pencil. Click and drag the pencil to draw a table border.
See the image:

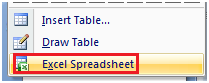
4) Excel Spreadsheet:
Click the Excel Spreadsheet option. Worksheet will appear in the slide, drag it to get the desired number of rows and columns.
See the image:

How to Modify or Format Table
Select the table you want to modify. Two new tabs Design and Layout appear in the Ribbon. These tabs offer various groups of commands to format tables.
When you click the Design tab it displays you four groups of commands; Table Style Options, Table Styles, WordArt Styles and Draw Borders.
See the Image:

When you click the Layout tab it displays six groups of commands; Table, Rows & Columns, Merge, Cell Size and Alignment.
See the Image:

How to Insert Table from Word or Excel
- Open the desired word document or Excel spreadsheet you want to insert
- Select and copy it
- Then place the cursor on the PowerPoint slide where you want to paste it
- Select Home tab and click the Paste command
How to Insert Chart
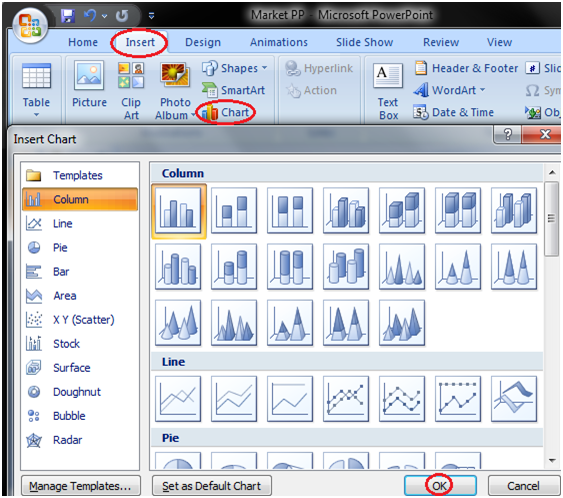
- Select the Insert tab
- In Illustrations group click on Chart command
- An Insert Chart dialogue box appears
- Select the desired Chart style and click Ok
- Chart will be added to slide and an Excel worksheet appears on right side of the slide
See the images:

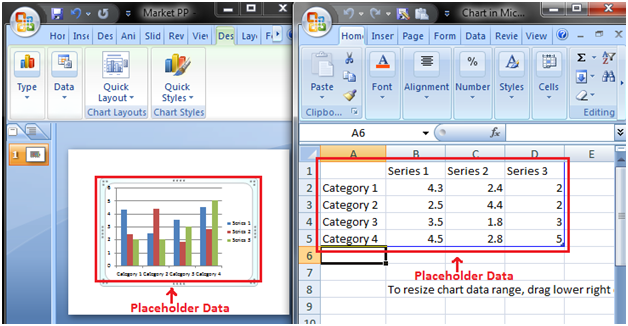
How to Enter Chart Data
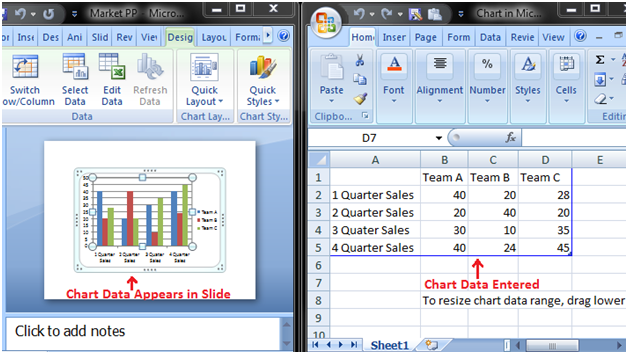
We can't enter data directly in charts. To enter data in chart we have to type it in excel spreadsheet that appears when you add Chart or click Edit Chart option.
The data that you enter in spreadsheet automatically appears in the Chart. Select the cell of spreadsheet and type the data it will appear in the slide. Repeat the process to enter the entire data.
See the image:

How to Format Chart or Chart Data
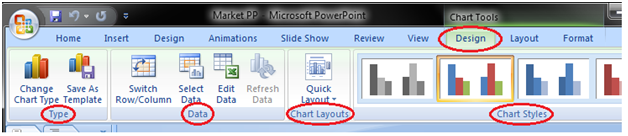
When you select the chart three new tabs Design, Layout and Format appear in the Ribbon. Each tab contains specific groups of chart tools to format charts and chart data.
The Design tab contains four groups; Type, Data, Chart Layouts and Chart Styles.
See the image:

The Layout tab contains six groups; Current Selection, Insert, Labels, Axes, Background and Analysis.
See the image:

The Format tab contains five groups; Current Selection, Shape Styles, WordArt Styles, Arrange and Size.
See the image:

power-point: 4
How to Format Font Size
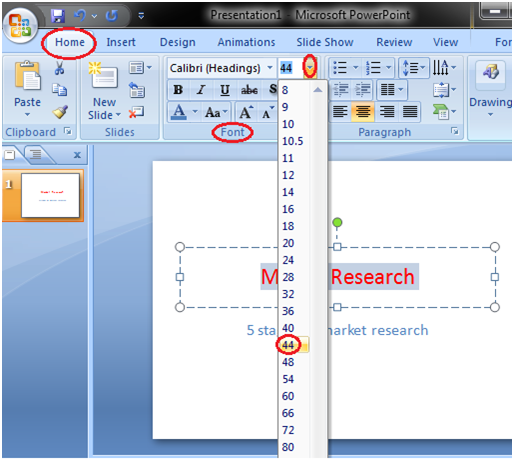
- Select the text you want to modify
- Open the Home tab and locate the Font group
- In Font group click the drop-down arrow next to font size option
- A list of various font sizes appears
- Move the cursor over the list and select the desired font size
See the image:

How to Format Font Style
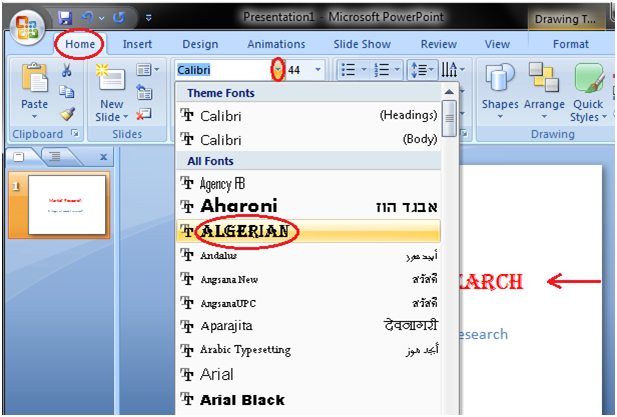
- Select the text you want to modify
- Select Home tab and locate the Font group
- In Font group click the drop-down arrow next to font style option
- A list of font styles appears
- Move the cursor over the list and select the desired font style
See the image:

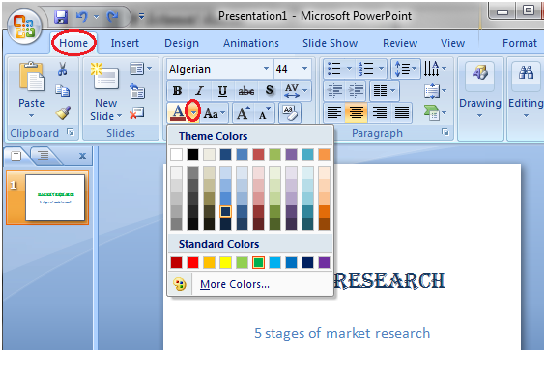
How to Format Text Color
- Select the text you want to change
- In Home tab locate the Font group
- In Font group click the drop-down arrow next to font color icon
- Font color menu appears
- Select the desired font color
See the image:

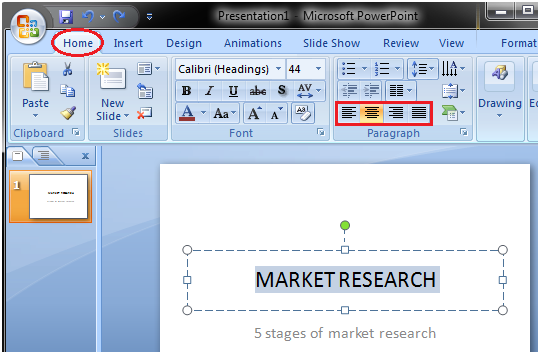
How to Change Text Alignment
- Select the text
- In Home tab locate the Paragraph group
- There are four alignment options at the bottom of Paragraph group
- Select the desired alignment option
The four alignment options are:
- Align Text Left: Aligns text towards left margin
- Center: Brings the text at center
- Align Text Right: Aligns text towards right margin
- Justify: Aligns text towards both left and right margin
See the image:

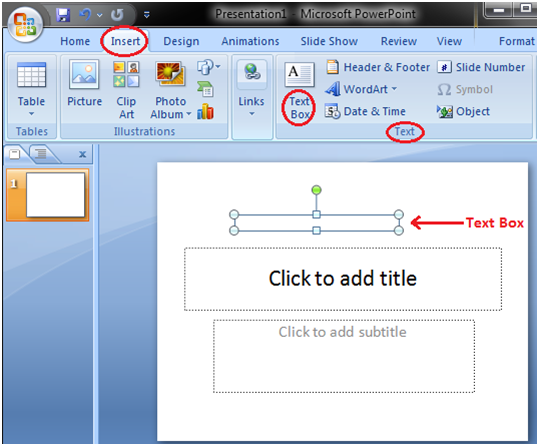
How to Insert a Text Box
In addition to placeholders you can insert text boxes in the slide. To add a text box follow the below listed steps.
- Open the Insert tab
- In Text group click the Text Box command
- Click on the slide and drag the cursor until text box takes the desired width
- Then release the mouse
See the image:

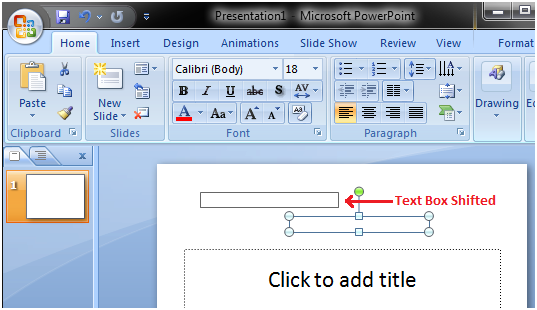
You can move and resize the text box. To move the text box click in the box and drag the mouse to the desired location.
See the image:

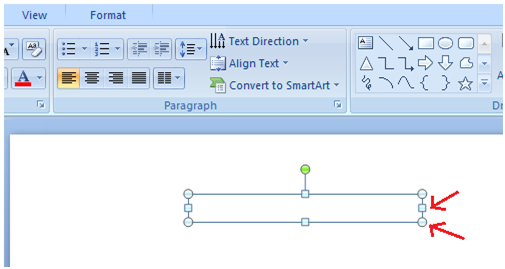
To resize the text box click the circle or square sizing handles of text box and drag the mouse to give it desired size.
See the image:

How to Insert Picture and Clip Art
To Add Picture:
- Click the Insert tab
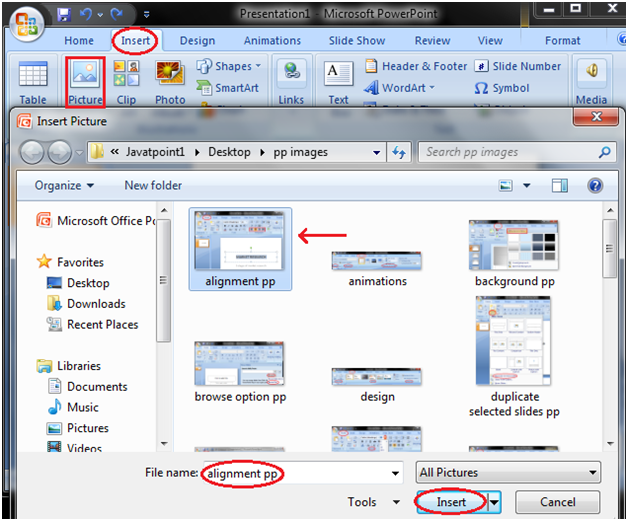
- In Illustrations group click on the Picture button
- Insert Picture dialogue box appears
- With a click select the desired picture
- Click Insert, the picture will be added to the slide
- Click and drag the picture to move it to desired location
See the image:

To Add Picture:
- Click the Insert tab
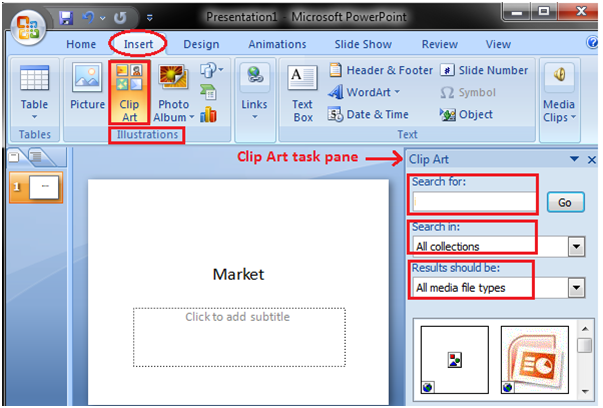
- In Illustrations group click the Clip Art button
- Clip Art task pane appears on the right side
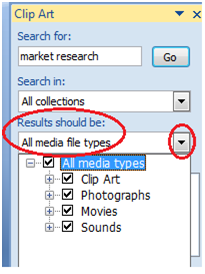
- In task pane you will notice three fields: Search for, Search in, Results should be
See the image:

In "Search Field" you can enter the keyword related to clipart you want to insert
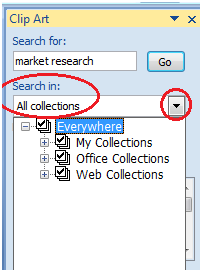
In "Collection Field" click the drop-down arrow. It gives four options. Choose the option that suits your requirement.
See the image:

In "Results should be" filed click the drop-down arrow, you will find five options. Choose the option that suits your requirement.
See the image:

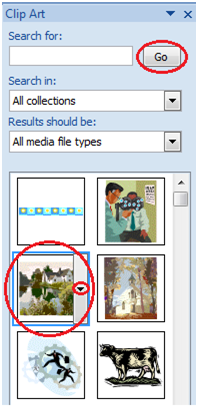
Now click the "Go". Clip Art menu will appear. Select the desired clip art or click the drop- down arrow next to clip art, it will display Insert option to add the clip art.

How to Edit Picture and Clip Art
- Select the Picture or Clip Art that you want to edit
- Format tab appears in the Ribbon next to View tab
- It displays four groups of commands; Adjust, Picture Styles, Arrange and Size group
See the image:

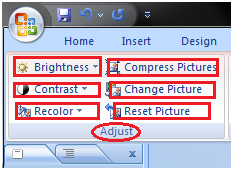
The Adjust group displays six commands.
See the image:

- Brightness: To increase and decrease the picture brightness
- Picture Contrast: To increase or decrease the picture contrast
- Recolor: To recolor the picture to give it special effect
- Compress Picture: To compress picture to reduce its size
- Change Picture: To change the picture
- Reset Picture: To discard all the changes made to the picture
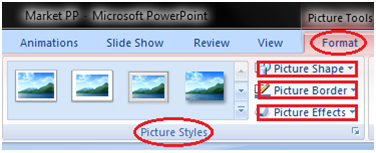
The Picture Styles group displays picture styles and three commands.
See the image:

- Picture Styles: To apply a picture style to the picture or clip art
- Picture Shape: To change the shape of the picture or clip art
- Picture Border: To give colors to the picture border
- Picture Effects: To apply visual effect to the picture
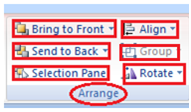
The Arrange group has six commands:
See the image:

- Bring to Front: To bring the picture in front of all other objects
- Send to Back: To send the picture behind other objects
- Selection Pane: It displays selection pane with various options to format and change order of picture
- Align: To align the multiple pictures on the slide. You can distribute them evenly across the slide.
- Group: To group different objects together
- Rotate: To rotate the text or objects
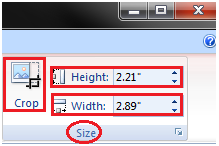
The Size group has three commands.
See the image:

- Crop: To remove unwanted parts of the picture
- Height: To change the height of the picture
- Width: To change the width of the picture
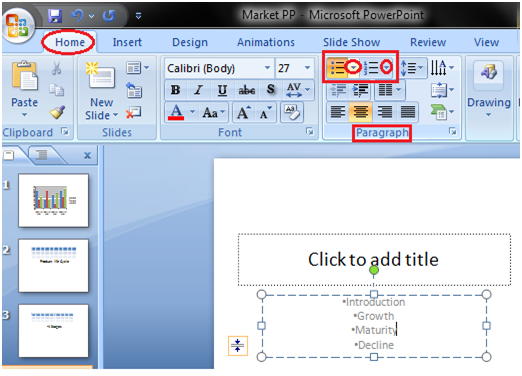
How to Create Bulleted or Numbered lists
- Select the text or list to which you want to add bullets or numbering
- Select Home tab and locate the Paragraph group
- Click the Bullets or Numbering button or click the drop-down arrow next to these buttons to see more bullet styles and numbering formats
- Select the style you want to apply to text
See the image: